I've kind of been off the grid the past couple of weeks, life has been busier then normal + there was a 3 day holiday weekend thrown in the mix. I have a couple of posts I plan to do this coming weekend.
Stay tuned- good things to come I promise :)
On a side note here are some things to keep you entertained until then (got this in an email today):
Your favourite virtue ::
Integrity
Your favourite qualities in a person::
Being funny, open minded, respectful, and love life.
Your favorite occupation ::
Healthcare/Medical Field but of course!
Your idea of happiness ::
loving and being loved
Your idea of misery ::
Constantly worrying and hating everything about life.
If not yourself, who would you be ::
A chef--- seriously--- I LOVE to cook and every time I watch top Chef I get goosebumps :)
Where would you like to live ::
Back in the sunshine state
Your favorite color and flower ::
Blue and any flowers that are colorful!
Your favourite heroes in fiction ::
Game of Thrones-- Kahl Drogo
Your favourite heroines in fiction :: Game of Thrones-- Daenerys Targaryen (ok I feel like a dork but the TV series was so good)
Your favorite heroes in real life ::
Our troops fighting for our country, the police and firemen who go out there day in and day out without ever thinking twice about saving your life/helping you. Also teachers because they are amazingly patient with little kids :)
Your favorite food and drink ::
Sunflower seeds, Chicken Pesto, and Riesling
Your favourite names ::
eh? I have no idea
Your pet peeve ::
When you ask for my opinion and then argue with me....
The change you most anticipate ::
I try not to anticipate change/future and try to live in the right now and take it a day at a time.
A gift of nature which I would like to have ::
patience
How I would like to die ::
emotionally and physically ready (Ego integrity vs Ego despair)
What is your present state of mind ::
Tired really tired BUT happy :)
Of what fault are you most tolerant ::
People who try to be perfect and are extremely Type A--
Your favourite motto(s) ::
What you want is often at odds with what is right.
Monday, September 10, 2012

Sunday, August 26, 2012
DIY Fall Wreath
It's still August, but Fall is just around the corner. It's been a hot/humid MN summer and I can't wait for fall. It's the perfect time for good casserole's (aka hot dish as they call it in the Midwest), soups, cookies, and nice crisp weather.
I was at Michael's and they have all their fall foliage out already along with Halloween stuff. I picked up a grapevine wreath for $4.99, a pumpkin berry garland for $5.59, (4) fall berry sprouts for $1.39 each, and (2) maple leaf sprouts for $0.90 each. Total was $17.94 before tax; not bad!
The best thing about this wreath is that all you need are your hands! No glue... no glitter... no paint.
I'm sure I'll have this hanging on my front door some time in September. For now it's tucked away but ready to go. Another cute idea is to paint a wooden letter and then hang the letter from the wreath.
I made one below ($0.99) that I painted all black and then painted the edges with gold paint.

Kristen
I was at Michael's and they have all their fall foliage out already along with Halloween stuff. I picked up a grapevine wreath for $4.99, a pumpkin berry garland for $5.59, (4) fall berry sprouts for $1.39 each, and (2) maple leaf sprouts for $0.90 each. Total was $17.94 before tax; not bad!
The best thing about this wreath is that all you need are your hands! No glue... no glitter... no paint.

 | |||||||||||
| 18" Grapevine Wreath ($4.99 @ Michaels) |
 | ||
| Pumpkin Berry Garland (bottom right), Fall berry sprouts (bottom left) |
 | |
| Step 1-- Unwind your Pumpkin berry garland so that it looks like the picture above. The garland should be approximately 5 ft in length so that you have enough garland to wrape around the wereath. |
 | ||
| Step 2-- Start wrapping your garland around the wreath and use the natural grapevine branches to intertwine the garland and the wreath. In the picture above I would lift up some of the branches within the wreath and run the garland under to hold in place. |
 | |
| Garland wrapped around the entire wreath. |
 | |
| Step 3-- Add the additional berry sprouts around the outer edges of the wreath. You can poke them into the grapevine wreath and secure by twisting the ends. The last step is to add maple leaves (or pumpkins) to the bottom right corner. |
I made one below ($0.99) that I painted all black and then painted the edges with gold paint.

Happy (almost) Fall ~*~
Kristen
Friday, August 24, 2012
Last Summer Recipe
Fall is around the corner but here's one last fun Summer idea...kabobs! Drizzle some olive oil and season- grill ~350 degrees or you'll burn the kabobs if it's hotter.
Remember if you use wooden skewer to soak for 10 minutes prior so that they don't burn or catch on fire.
~Kristen


Remember if you use wooden skewer to soak for 10 minutes prior so that they don't burn or catch on fire.
~Kristen
Saturday, August 18, 2012
Flower Tutorial Part 1 & 2
Hey guys- I said a few weeks ago I'd post a tutorial for the paper flowers. There are 3 types of flowers that I made. Tutorial #1 is how to make a tissue paper flower, Tutorial #2 is how to make a coffee filter flower and next week I'll post how to make the complicated coffee filter flower. I never do video tutorials but I did this for Laura :) She needs to make these soon and taking 20 million pictures for each step was too complicated.
~Kris
~Kris
Tuesday, August 7, 2012
Lazy cooking
My life like every other person I know, is insanely busy. It's nice to have a home cooked meal, but sometimes you get home late or have odd hours and don't feel like cooking. Crock pots are fun for soups, but you can't make every meal in a crock pot. Making food in advance is easy because all you have to do is put in the oven or heat up.
I tried a variation of my dad's "stuffaroni" recipe (aka stuffed manicotti) and prepared it a day before I planned to bake it. I browned some ground beef and onion and seasoned. Once the ground beef cooled I added an egg, bread crumbs, spinach and Parmesan, and salt & pepper.

The egg and bread crumbs hold everything together. I stuffed manicotti shells with my meat mixture and lined them in a 9 x 13 bake pan.
 I had some left over ground beef mixture so I mixed it with 1 large jar of marinara sauce and seasoned the sauce up with garlic, basil, and oregano. I let the sauce cool slightly and stored it in a tupperware container.


Easy dinner: Cover the stuffed manicotti noodles with the marinara sauce, sprinkle with fresh Parmesan and bake at 350 for 45 minutes covered, followed by another 10 minutes uncovered.
It makes a lot- it's AMAZING left overs and it's DELISH :)

I tried a variation of my dad's "stuffaroni" recipe (aka stuffed manicotti) and prepared it a day before I planned to bake it. I browned some ground beef and onion and seasoned. Once the ground beef cooled I added an egg, bread crumbs, spinach and Parmesan, and salt & pepper.

The egg and bread crumbs hold everything together. I stuffed manicotti shells with my meat mixture and lined them in a 9 x 13 bake pan.


Easy dinner: Cover the stuffed manicotti noodles with the marinara sauce, sprinkle with fresh Parmesan and bake at 350 for 45 minutes covered, followed by another 10 minutes uncovered.
It makes a lot- it's AMAZING left overs and it's DELISH :)

Sunday, August 5, 2012
Napkin Decoupage
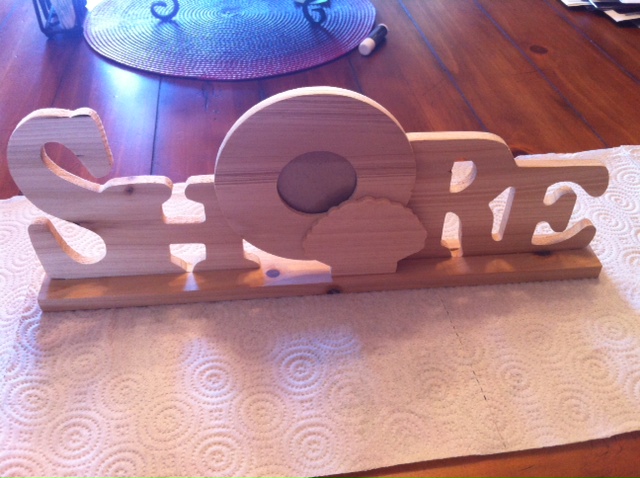
I bought this wooden cut out that says SHORE from Michael's for $2.99. The center part of the "O" is a picture frame which is kind of neat. I bought it because it reminded me of being back home in California and of my parents house. My mom has this cool beach theme going on in the house and I knew she'd love it (probably will end up with a pic of the spoiled granddaughter). :o)
My younger brother was in town for a wedding he was in on Friday (in the Midwest of all places) so I got to see him for a couple days and it worked out perfectly because he can bring this back home to my mom.
I started out by painting the wooden cut out using a gradient theme. I mixed some acrylic paint to make a turquoise color and painted the top third of the cut out in teal/turquoise. The middle 1/3 was painted with a deeper blue, and the bottom 1/3 was painted with a purple/teal mix.


My younger brother was in town for a wedding he was in on Friday (in the Midwest of all places) so I got to see him for a couple days and it worked out perfectly because he can bring this back home to my mom.
I started out by painting the wooden cut out using a gradient theme. I mixed some acrylic paint to make a turquoise color and painted the top third of the cut out in teal/turquoise. The middle 1/3 was painted with a deeper blue, and the bottom 1/3 was painted with a purple/teal mix.
 |
| Blue, green, Sapphire blue, and white |
 |
| First 1/3 of the cut out |
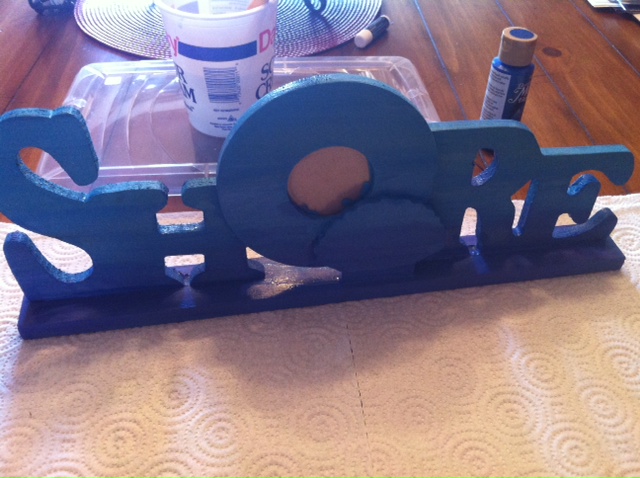 |
| Painted cut out |
After I painted the wood cut out I looked at a couple of napkins to decoupage onto the wooden cut out. I had 2 sets of napkins from when I was at Ikea and decided to use the blue napkin. The first thing I did was remove the paper backing from the napkin. This napkin actually had two layers of paper backing. In order to decoupage the napkin design and have the background be transparent you have to remove both paper backings.
 |
| Napkins from Ikea |
 |
| Paper backing (layer #1 of napkin) |
 |
| Both layers removed |
There are many types of decoupage glue: thick, thin, glitter, matte, shiny etc. You can purchase decoupage from local craft stores like Michael's or Archiver's. Since this napkin is essentially designed tissue paper, I decided to use the thinner decoupage glue (Anita's) because it's very runny it's easier to apply without tearing the napkin. There are two ways you can decoupage a napkin onto a project:
1. You can decoupage the entire napkin onto a project. This requires putting your decoupage glue on all of your craft piece and gently laying the entire napkin over it and then covering with glue. Once the glue dries you pull the tissue paper away from the areas not glued (this will make more sense in a second...)
2. The second option is you can cut out patterns from the napkin and individually decoupage bits and pieces onto your project. This is the option I went with for this project. Do not worry about overhang or pieces of the napkin that are not perfect. The glue dries clear and the design dries with the a transparent background.


Once the glue dries you can gently remove the outer edges. You can use an emery board or sand paper. You barely need to sand because the paper that's not glued easily tears away. Once you've removed the edges of the napkin overhang, cover the ENTIRE craft with a layer of decoupage glue. For this part of the project I used the Modge Podge brand. It's thicker and also dries clear and has a matte finish. I like using a matte finish because it doesn't show as many flaws as a glossy finish.
 |
| Filing away the remaining overhang |
 |
| Entire project covered with a coat of decoupage |
Once the project is completely dry (1-2 hours) you can decorate with embellishments. I added some glitter to the bottom part of the stand and then after the decoupage glue started to dry I covered with another layer to seal the glitter into the project and prevent it from flaking.
Here's the final project after it dried (2 hrs).

Happy Summer :)

Thursday, August 2, 2012
Brown Sugar Salmon
I always use lemon and make some creation when I cook salmon, but have never tried the sweet variation of sauces/glazes you can use when making salmon. Tonight I decided to switch it up a bit.
What you need:
~2lbs of salmon
Glaze:
1 tsp Dijon Mustard
2 tbsp Brown Sugar
1 tsp Soy Sauce
1 tbsp butter
1 tsp Honey
Salt and Pepper
Over a low heat mix all of the glaze ingredients and stir until the brown sugar is dissolved and butter is melted. Brush onto your uncooked salmon. You can either bake the salmon at 350 uncovered for 20 minutes or grill the salmon (in foil) at 400 degrees for 15 minutes. The salmon should flake and pull easily away from the skin.

What you need:
~2lbs of salmon
Glaze:
1 tsp Dijon Mustard
2 tbsp Brown Sugar
1 tsp Soy Sauce
1 tbsp butter
1 tsp Honey
Salt and Pepper
Over a low heat mix all of the glaze ingredients and stir until the brown sugar is dissolved and butter is melted. Brush onto your uncooked salmon. You can either bake the salmon at 350 uncovered for 20 minutes or grill the salmon (in foil) at 400 degrees for 15 minutes. The salmon should flake and pull easily away from the skin.
 |
| The ingredients |
 |

 |
| Final product |
Subscribe to:
Posts (Atom)